See Also
- Cancelling Orders
- Recording Missing Shipments
- Processing Returns
- Marking an Order as Shipped
- Recreating an Order
- Notifying Drop Shippers
- Customizing Drop Shipper Notifications
- Recording Tracking Numbers from Drop Shippers
- Adjusting Costs
- Insuring Shipments
- Deleting Online Pictures
- Splitting and Combining Shipments
- Creating Orders
- Processing Orders
- Combining Orders
- Leaving Feedback
- Printing Packing Lists
- Printing Postage and Carrier Labels
Receiving Payments
Receiving payments can occur manually or automatically, depending upon how the buyer pays.
Receiving Payments Automatically
When a new order is created, it is given a default status of "Awaiting Payment". If the buyer paid on the eCommerce site at the time of purchase (or pays online at some time in the future), the SixBit Agent will automatically retrieve the payment information and set the status to "In Process". As long as the buyer pays online, there is really nothing you need to do to receive the payments.
When accepting payments through a payment service like PayPal, the payment service fees will be returned through the site. It can be more reliable to obtain them directly from the Payment Service. This can be enabled by providing SixBit authorization to retrieve the fees directly from the payment service as described in Managing Payment Services.
Receiving Payments Manually
If the buyer does not pay online but instead sends a check or money order, the payment will need to be recorded manually.
To receive payments manually:
- Open the Ship Orders mode. How?How?
- From the grid, select the order for which the payment will be recorded.
| You can use the filter row or automatic filtering to quickly locate the order based on the buyers name or other information. The filter row option will allow you to enter a name or other information to search for and automatic filtering will allow you to choose from a list of names. |
- Double-click the row or click the Edit Order button to open the order record.

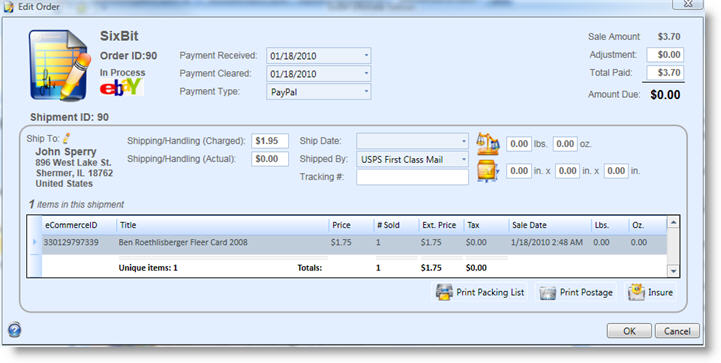
- Enter the date that the payment was received from the Payment Received date picker. This is the date that the check, money order, or electronic payment was received. This is not necessarily the date that the payment has actually cleared. Orders should remain in the "Awaiting Payment" status until the payment has actually cleared.
- When the payment has cleared, the date Payment Cleared can be selected from the date picker.
- Fill in the Payment Type from the drop down.
- Enter any adjustments that should be made to the sale amount in the Adjustment field. Adjustments are often added when buyers choose to include engraving, monogramming or any other service that will increase the price. If an adjustment is entered, a new field will appear below the Adjustment field where the Reason for Adjustment can be entered. (i.e. engraving "Love, John")
- Enter the amount that the buyer is paying in the Total Paid field.
- If the shipping address is not correctly entered, it may be edited by clicking the pencil icon next to Ship To label.
- Click OK when finished. If the Amount Due is <=0, and a Payment Cleared date is provided and the order will automatically get a status of "In Process". The order can then be packaged and shipped.