Saving Grid Layouts
In other topics, we have described how to sort columns, move columns, hide/show columns, and group columns. In this topic, we are going to put them all together and allow you to save all of your customizations in what we call a "grid layout".
A grid layout is a way to save the state of the changes you have made to a grid to allow for them to be easily retrieved at a later date. For example, when you are looking at orders, you will want to see a different set of fields when you are looking at orders that have been paid for versus those that have not been paid for yet. With a grid layout, the set fields can be saved along with the sort order which allows the two grid layouts to be switched between easily.. To make it even more useful, we will save the latest grid layout that you used to view any status, substatus, folder, or view.
Initially, SixBit comes with a set of grid layouts for each mode with each status, substatus, folder, or view assigned to one of the initial grid layouts, however, as grid layouts are added, changed, or used, SixBit will save them with the statuses, folders and views. The end result is a highly customized data view giving you the data that is needed, when it is needed.
With grid layouts, you can:
- select a grid layout
- modify grid layouts
- create new grid layouts
- rename grid layouts
- reorder grid layouts
- reset grid layouts
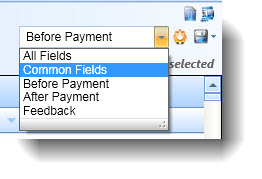
SixBit comes with an initial set of grid layouts. You can select different grid layouts to get different views of your data.
From any of the main Modes, select from the Grid Layout drop down in the upper right corner of the grid.

Select the grid layout that will be modified.
Apply the desired sorting, column selection, column order, and grouping changes.
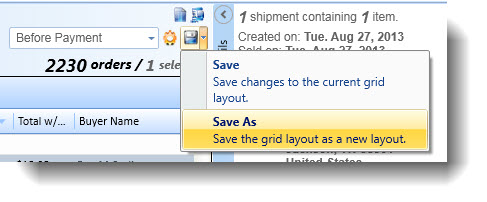
To save the grid layout click the Save icon (
 ) next to the grid
layout drop down. This will save the grid layout for all views
for which it is used. To save the grid layout with a new
name, click the arrow on the save button and choose Save
As.
New grid layouts can be created from existing grid layouts.
Select a grid layout to use as a starting point.
Click the arrow on the save button and choose Save As.

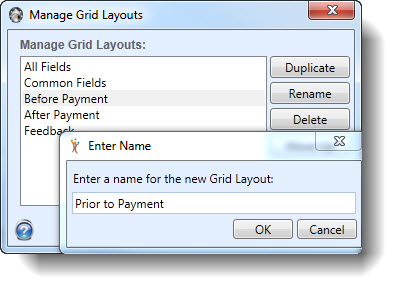
Enter the name for the new grid layout and click OK. It will then appear in the grid layout drop down for that mode.
Grid layouts can be renamed from the Manage Grid Layouts window.
Click the Manage icon (
 ) next
to the grid layout drop down.
Select the grid layout to be renamed and click Rename.
Enter a new name for the grid layout and click OK.

Grid layouts can be reordered from the Manage Grid Layouts window.
Click the Manage icon (
 ) next to the grid layout drop down.
Select the grid layout to be reordered and click Move Up or Move Down.
Grid layouts can be reset to the "factory defaults" from the Manage Grid Layouts window.
Click the Manage icon (
 ) next to the grid layout drop down.
Select the grid layout to be reset and click Reset.